Error: ‘Start DAO Recording’ Command Failed On Device 3:0:0 Disc Type Is Not Supported.

Question:

Error: ‘Start DAO Recording’ command failed on device 3:0:0 Disc type is not supported.

Answer:

This error may also appear as:

Error: ‘TEST UNIT READY’ command failed on device 1:1:0. Device contains no disc or is not ready. (04h 00h 02h 02h 3Ah 00h

Upgrade to Microstudio 4.00x and this error will no longer occur. If you do not wish to upgrade, then the following should allow you to fix this problem.

This occurs with any of the DVD-/+R drives. This includes the Plextor PX-W708, PX-W712 Px-W716 DVD Recorder Models. Some users have seen this when installing some Printer software drivers.

Remove Roxio EZ CD Creator 6 and Nero 6 or any other Burning program from starting at boot. Most of the time you can go into the programs settings and turn off the option to start the program at Windows Startup. These programs are known to cause this error.


Error: Finish DAO Recording, Command Failed on Device 0:0:0. Unit Attention

Question:

Error: Finish DAO Recording, Command Failed on Device 0:0:0. Unit Attention

Answer:

IMPORTANT NOTE: The device 0:0:0 below may be different, depending on how the drive is attached to the computer. Also, the (04H 00H 02H 05H 2CH 00H) string may contain different numbers.

ERROR: Finish DAO Recording, Command Failed on Device 0:0:0. Unit Attention. (04H 00H 02H 05H 2CH 00H)

This error means that the drive is going bad, you need to contact the drive manufacturer.

Microstudio Won’t Import Discs

Question:

Microstudio Won’t Import Discs

Answer:

If the drives show under the Tools Menu\Detect Drives, do the following:

  1. Open Microstudio
  2. Click the Duplicate Disc Tab.
  3. Left click the Down arrow to the right side of the Reading and Writing Drive Fields.
  4. Left click this same drive in the list at the very bottom, even though it is the same name. This is the only way to reset the registry key for this selection.
  5. Click the OK button.
  6. Close Microstudio to save the Registry Key.
  7. Run Microstudio and the selected drive should now appear and work correctly.

My Drive Will Not Show All The Tracks On The CD

Question:

My drive will not show all the Tracks on the CD

Answer:

This is normally fixed by updating the firmware for your drive.  You can find the Updates to Plextor drives at: http://www.plextor.com/english/support/support_downloads.html#firm

Here is a website that has links for different models of drives: http://www.cdrinfo.com/Sections/Firmware/Home.aspx

How Do I Enable Dual Display On My Computer?

Question:

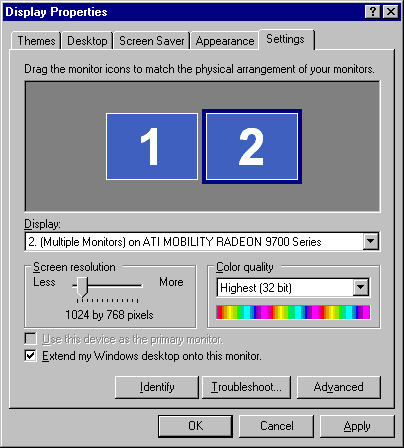
How do I enable Dual Display on my computer?

Answer:


  1. Right click anywhere on the Desktop, not on an application screen or icon.
  2. Select Properties at the menu bottom.
  3. In the dialog that appears, click the Settings tab at the top right.
    • You will see two monitor images. click on image #2 to select it (IMPORTANT: Do NOT double click the image).
    • Set the Screen resolution to 1024×768 or higher
    • Set the Color quality to Medium 16-bits or Highest 32-bits.
    • Check Extend my Windows Desktop to this Monitor.
    • Click OK to set your changes and close this dialog.

When in Extended Desktop mode you should see your Desktop wallpaper only, no icons, toolbars, etc. If this doesn’t work, contact the Computer manufacturer or the video card manufacturer to find out how to make your system support dual display.

IMPORTANT NOTICE: With Windows XP Home, an ATI card must be set (read the manual) to Extended Desktop Mode, not Clone Mode, which mirrors the pc display. Then when running Hoster the TV shows the song lyrics, and when not running Hoster the TV displays your Desktop wallpaper.

Problems with M-Audio Card Audio and Graphics

Question:

Problems with M-Audio Card Audio and Graphics

Answer:

Sometimes the graphics or audio from CDG Karaoke discs, or tracks imported as CDG files on the hard drive will play a combination of:


  1. No audio or graphics
  2. Only graphics
  3. Only audio

This is caused by the M-Audio card default Codec sampling rate. If it is at 22,050, you need to set it to 44,100 hz. The audio quality should now be excellent, and no more dropped audio or graphics.

Disable Windows Autorun For All CD/DVD/ROM Drives

Question:

Disable Windows Autorun for all CD/DVD/ROM Drives

Answer:

The Windows Autorun is always enabled for a drive until you disable it. When you insert an Audio CD or Karaoke CDG disc, Windows will try to “do something” with it for you. When using Microstudio or Hoster, this will cause long delays.

Also, add on Sound Cards install proprietary software that pop up and attempt to play CDs inserted in a drive unless Autorun is disabled.

Autorun causes extra delays for the drive to spin-up, to load unwanted software, and to allow advertisements embedded on some CDG discs to appear. Can you imagine running Hoster and adding a track to play from a Singer’s disc they hand you and an advertisement pops up in the middle of your show? You want to DISABLE Autorun!

Follow these steps to disable Autorun on a CD/DVD drive (this is from the Hoster Manual “Troubleshooting Guide”, “Reducing Audio Drops While Playing” topic):

  1. Click the Start button
  2. Click the Run command
  3. Type in regedit and press the Enter key
  4. Locate HKEY_LOCAL_MACHINE and click the + at its left to open its contents up
  5. Scroll down to System and click the + to its left
  6. Locate CurrentControlSet and click the + to its left
  7. Locate Services and click the + to its left
  8. Locate Cdrom and click it directly to see its contents on the right screen. If you have more than one CD/DVD/ROM drive, I suggest you disable Autorun for each drive.
  9. Locate Autorun and move your mouse to it, then click and release your RIGHT mouse button. In the menu that appears, move your mouse to Modify and click your mouse LEFT button to see an edit dialog box. Enter zero (0 must replace the default 1) and click the OK button. This disables Autorun for this drive.
  10. Click the X icon at the top right of this RegEdit screen to close it.

Where Do I Get My Registration Code?

Question:

Where do I get my Registration Code?

Answer:

Your Registration Code is located in your Store account.  To get to your Registration code Login to your Store account

  1. Log into your MTU Store Account (click here to learn how to go to your account).
  2. Click View My Order History in the right column.
  3. When you orders appear, find the one where you purchased the software you want the Registration Code for.
  4. You can click the VIEW button by each order and see what it contained, and to see your Download link, Registration Email, and Registration Code.